Getting started
Install Tea, finish the first-run setup, and get to know the main screens and controller buttons.
Tea is the Premium Clean Fans edition of Freedeck: a game front end for any Android device, built mainly for gaming handhelds, with a Steam Deck edition too. It organizes and launches the games already on your device, adds box art, labels and descriptions automatically, and can download games from your own cloud drive or home NAS and sync play records and saves across devices. Tea offers no game downloads and contains no games or download links.
#Getting Tea
Tea is for players who support the author (a monthly 充电 (charge) pack on B站 (bilibili), or an afdian (爱发电) plan of ¥10 or more). See the download page for how to get it.
#Installing
Tea needs Android 10 or later and installs on phones, tablets and gaming handhelds. The interface is made for handhelds and fits 720p / 1080p screens at 16:9, 4:3, 3:2 and 1:1; portrait works too. Support for dual-screen devices is on the way.
- Copy the APK file to your handheld (or download it on the handheld directly).
- Open the APK in a file manager.
- If the system says installing apps from unknown sources isn't allowed, follow the prompt to allow that file manager to install apps, then go back and continue.
- Once it's installed, open Tea from the home screen.
Later updates happen inside the app, with no APK to install by hand; see Settings and updates.
Tip: Tea and Coffee are two separate apps and can be installed side by side. If you have both, update them together and let Tea handle box art and labels; see the FAQ.
On a Steam Deck? Installing and using it works differently; see Steam Deck edition.
#First-run setup
The first time you open Tea, a three-step setup guide starts. You can use a controller or the touchscreen.
#Step 1: Choose a language
On the "欢迎 / Welcome" page, pick 中文 or English. You can switch at any time later in Settings → General → Language.
#Step 2: Choose the Freedeck folder
The Freedeck folder holds Tea's settings, scraping results and images. By default it's Freedeck at the root of internal storage (/storage/emulated/0/Freedeck).
- Tap Allow all-files access, turn on Tea's switch on the system page that opens, then go back.
- When the button changes to Use this folder, tap it to use the default location (recommended). To put it elsewhere, tap Change and pick another.
Tip: All-files access is required: Tea needs it to read your ROMs, choose folders such as Download, and save box art.
Tip: Point Coffee and Tea at the same Freedeck folder and they share settings and box art. After reinstalling Tea, just grant the permission again and the settings and box art in the default Freedeck folder come back automatically.
#Step 3: Choose the ROM folder
Choose the folder that holds your game ROMs, for example ES-DE's ROMs folder.
- Tap Choose your ROM folder, then find and select that folder.
- Tea recognizes the console subfolders inside it (such as
gba,psx,snes) and lists the consoles it found. Folders for the other consoles are created automatically using ES-DE's names. - Tap Finish and scan.
No ROMs yet? Tap Skip and set it later in Settings → Emulator games → Default ROM folder.
You then land in the library. Tea scans the games on your device and fetches box art and labels one by one in the background. With lots of games this takes a while; you can keep using the app meanwhile.
#After the setup guide
All of these are optional; set them up in Settings when you need them:
| What you want | Where to go |
|---|---|
| PC games in a separate folder | Settings → PC games → PC / Pool games folder |
| One console's ROMs somewhere else | Settings → Emulator games → ROM folder per console |
| Download games from your own cloud drive or NAS | Settings → General → Library drive; see Cloud drive and downloads |
| Sync play records and saves across devices | Settings → General → Sync drive; see Drive sync |
| Scrape with your own ScreenScraper account | Settings → Emulator games → ScreenScraper account |
| Install emulators | Utility in the menu; see Utility |
Every login is optional: without any, you can still organize and launch your games.
#Main screens
#Menu
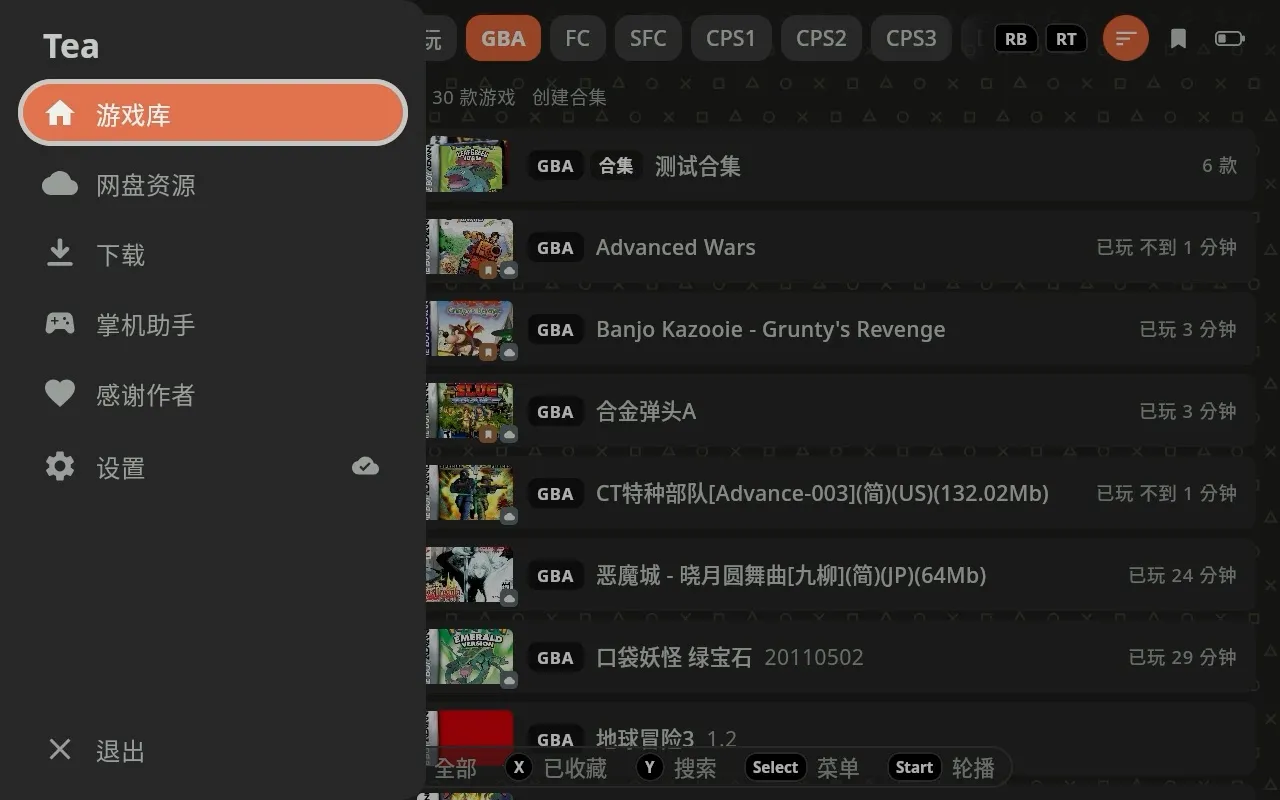
In landscape, press Select or tap ☰ in the top-left corner to open the menu:
| Menu item | What it's for |
|---|---|
| Library | All the games on your device, in one tab per console |
| Cloud drive | Browse and download games from your own cloud drive or home NAS (hidden when you're logged in to a sync drive only, with no library drive) |
| Downloads | Download tasks and progress; shows a count while tasks are running |
| Utility | Install and update emulators, set up bezels and shaders, setup wizard |
| Thank the author | QR codes for supporting the author |
| Settings | All settings and app updates |
Once you're logged in to a sync drive and sync is on, the Settings row ends with a small cloud showing the sync status; tap it to sync right away. When a new version is out, a small red dot appears on ☰ and on Settings.
#Portrait
In portrait (a phone, or a handheld held upright), the menu becomes a navigation bar at the bottom of the screen with the same items. On the Utility page, the setup wizard is a floating button in the bottom-right corner.
#Controller buttons
A floating hint bar at the bottom of the screen shows what each button does on the current page, and changes from page to page. Common buttons:
| Button | Action |
|---|---|
| A | Select / confirm |
| B | Back |
| Select | Open the menu |
| Start | Library: change layout; Utility: setup wizard; other pages: open Settings |
| LB / RB | Switch tabs |
The library has more buttons, such as Start to switch between grid / list / carousel, Y to search and X to show bookmarks only; see Library.
Tip: If your controller has A on the right (Nintendo layout), go to Settings → General → Button layout and choose Nintendo; the hint bar and buttons follow.
#Next steps
- Library: tabs, layouts, search, bookmarks, collections and custom tabs
- Artwork and scraping: scraping, cartridge looks, custom labels and box art
- Cloud drive and downloads: download games from your own cloud drive or NAS
- Drive sync: sync play time, beaten games and saves across devices
- Playing games: choosing emulators, BIOS, multi-disc games
- Utility: install emulators, bezels and shaders
- Cheats
- AI features
- Steam Deck edition
- Settings and updates
- FAQ