Utility
Install and update emulators in Utility, sort out install conflicts, set up RetroArch bezels and shaders, or configure it all at once with the setup wizard.
#Open Utility
Go to Utility from the menu on the left. There are three tabs at the top:
- Emulators: download, install and update emulators.
- Bezels: add frames around each console's games in RetroArch.
- Shaders: add screen effects such as LCD grids and scanlines to each console in RetroArch.
The last button in the tab bar is Setup wizard, the recommended place to start on a new device (see the end of this page).
#Install and update emulators
#Emulator list
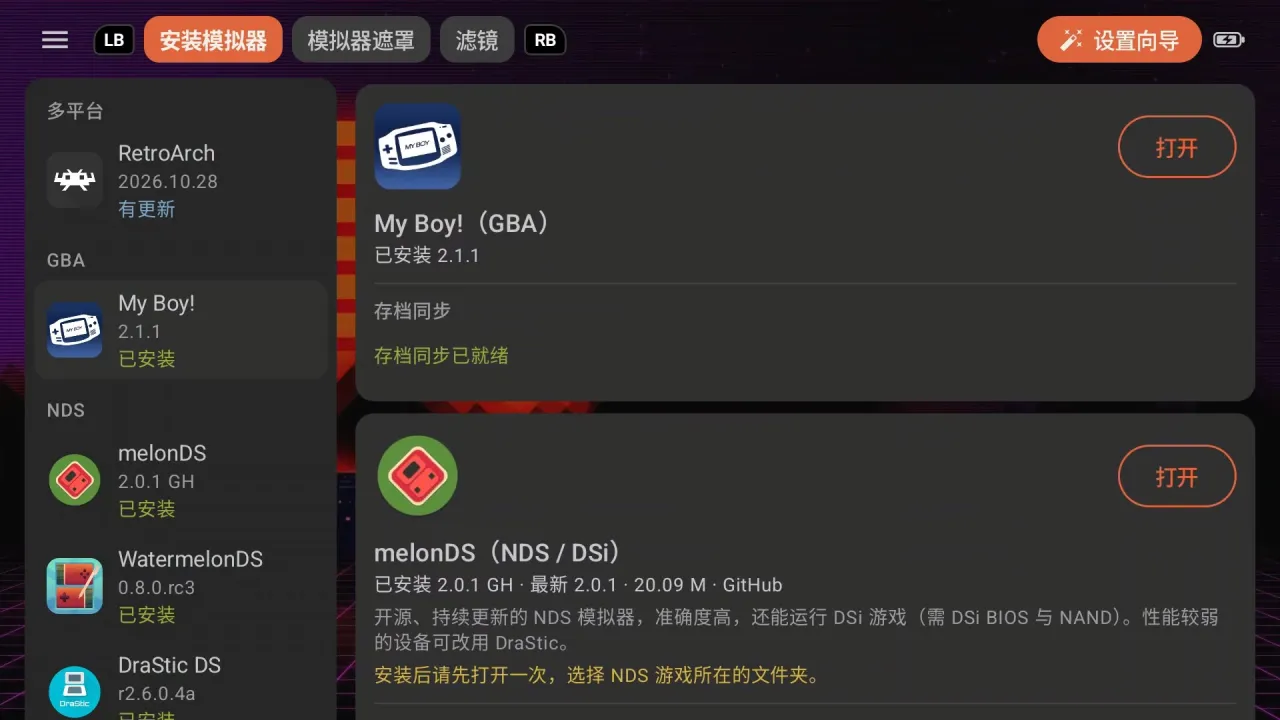
On the left is a directory grouped by console (multi-platform, NDS, 3DS, N64, NGC / Wii, Wii U, Switch, PS1–PS3, PSP, PS Vita, DC / NAOMI, Arcade, N-Gage, PC). Each entry shows its version and status:
| Status | Meaning |
|---|---|
| Installed (green) | Installed and up to date |
| Update (blue) | A new version is available |
| Not installed (grey) | Not installed yet |
| Installing (yellow) | Downloading or installing |
A version showing Checking… means the latest version is being looked up; for Couldn't check, tap the hint on the card to try again.
On the right are cards for every emulator. Whatever you select on the left, the right side scrolls to its card.
#Install, update, open
- On the emulator's card, tap Install.
- The first time, Android asks you to allow Tea to "install unknown apps": tap Open settings, turn the switch on in the system page, then come back.
- When the download finishes, confirm the install as Android asks.
Installed emulators have Open on their card, and Update when a new version is out. Leaving Utility mid-download doesn't stop it.
- Nightly builds whose version is a commit number (such as Eden Nightly and AzaharPlus) don't show update prompts.
- On networks in mainland China, downloads go through a faster route automatically, so RetroArch, PPSSPP and others finish quickly; if that route is slow, it switches back to the original address by itself.
Tip: emulators from firmware packs that you installed yourself (My Boy!, RetroArch G, Yaba Sanshiro 2, M64Plus FZ Pro, STORM SWITCH, Lime3DS, Citra from the 天马包 (Pegasus pack)) are listed too and can start games, but can't be downloaded or updated here.
#Rows on the card
An installed emulator's card may have these rows at the bottom, each with a line about its current state and a button on the right:
- BIOS: where the BIOS goes and how to import it; see the BIOS section of Playing games.
- Cheats: where cheats are written; you can Change or Reset it. See Cheats.
- Save sync: shows only the step still missing, such as tapping Allow once to grant access, setting the save folder in the emulator, or Log in to your sync drive; when everything is set it shows Save sync is ready. See Save sync.
Some cards have a row of their own, such as Vita3K's Vita3K's storage folder, or Allow for GameHub Lite and DroidDeck.
#About RetroArch
Utility installs the universal RetroArch (nightly): the floating button, choosing a disc at start and other features need it, and the stable 1.22.2 doesn't support them. The package has no cores; after installing, go to Load Core → Download a Core in RetroArch.
If you previously installed the stable RetroArch or the Play Store version, the card suggests switching to the universal version:
- If your saves are in the RetroArch folder under
Android/media/, copy them out first; uninstalling deletes them too. - Tap Uninstall it on the card, then install the universal version.
- In the new RetroArch, download your cores again (Load Core → Download a Core) and set up your hotkeys again.
- Go back to Tea and start games as usual. The bezels and shaders you set up before are reconnected automatically when a game starts.
If your RetroArch shows garbled Chinese text (a build missing Chinese fonts), the card tells you too: install the official version above first, then uninstall the old one.
#Emulators worth knowing
| Emulator | Notes |
|---|---|
| Vita3K+ | Experimental community fork of Vita3K: runs more games but may be unstable, aimed mainly at Snapdragon. Can be installed alongside Vita3K; set both to the same storage folder |
| Vita3K | The old version (0.2.0) is signed differently and can't be updated in place: back up your saves, uninstall the old version, install the new one, then reinstall the firmware |
| Citra-MMJ | Performance fork of Citra that may run better on low-end devices; updated infrequently. AzaharPlus is still recommended for 3DS |
| Lemon | Switch emulator based on Eden with built-in cheats; Eden is still recommended for Switch |
| Eden Nightly | Eden's nightly build; can be installed alongside the stable version, with separate keys, firmware and saves |
| Dolphin MMJR2-VBI | Performance fork of Dolphin that runs some games better on low- and mid-range devices; can be installed alongside the official Dolphin |
| WatermelonDS | Enhanced fork of melonDS: achievements, Vulkan, shader presets, external displays; can be installed alongside melonDS |
| MAME4droid | The latest MAME, for arcade games FinalBurn Neo can't run; needs full (non-merged) ROMs for the matching MAME version |
| ARMSX3 | PS3 emulator at an early stage; needs a powerful device and your own PS3 firmware |
| Cemu | Wii U; needs a powerful device and Android 11 or later |
| DroidDeck | PC; Snapdragon only (Adreno 730 or newer), downloads about 3 GB of runtime on first launch |
#Install conflicts
When an install fails with a conflict, the card tells you which app is in the way and what to do:
- Same emulator, different signature: the version already on the device came from somewhere else and has to be uninstalled first (back up your saves first). Tap Uninstall on the card.
- Another app uses the same component name: the two can't be installed together; uninstall that app first.
- The blocking app can't be found: it may be in a cloned-app / dual-app space or a work profile, or its data was kept when it was uninstalled. Uninstall it there, or tap Copy command and run that command over adb on a computer.
The text in brackets at the end of the card is the system's original error; just send a screenshot when asking for help.
#Bezels
Bezels are frame images around the game picture, set per console, for RetroArch.
#Before you start
- Needs all-files access: if it's missing the page tells you; tap Grant.
- Open RetroArch at least once so it creates its settings folder.
#Set one up
- Go to Utility → Bezels. Consoles already set up come first, the rest are sorted by popularity.
- Tap a console and pick a bezel under Choose a console bezel; each has a preview.
- The confirm window lists the settings that will change (the original values are recorded, so you can reset at any time). Turn on Integer scaling if you like: the game is enlarged by whole-number steps so shader grids and scanlines look even, and the bezel shrinks to wrap the picture (the picture may get smaller).
- Tap Apply. It takes effect when the game is reloaded.
To undo it, tap Reset next to the console: the bezel image is deleted and RetroArch's related settings go back to how they were before the bezel was set.
#Good to know
- Only bezels that fit your screen shape are listed (16:9, 4:3, 3:2, 16:10, 8:7, 1:1 and others each have their own). If none fit, it shows No bezels for this screen shape yet. 16:10 and 3:2 screens can also use 16:9 bezels, with borders top and bottom.
- Built in are the full frame set from the community 天马包 (Pegasus pack), bezels by 中登95, GermanTacos and more; some other artists' bezels are downloaded from the artist when you use them. Credits are under Settings → About.
- When several consoles share one core (GB and GBC both use Gambatte, for example), the bezel belongs to whichever console was set first; the others show "used by the console bezel".
- For a bezel marked "set for another screen — misaligned here", change or reset it.
#Shaders
Shaders change the look of the picture; they're also set per console, for RetroArch.
#Set one up
- Go to Utility → Shaders and tap a console.
- Pick a shader and tap Apply. The confirm window also offers Integer scaling.
- To undo it, tap Reset.
#Available shaders
| Shader | Effect |
|---|---|
| LCD / CRT (recommended) | LCD grid for handhelds, CRT scanlines for home consoles and arcade |
| Light | A light effect that's easy on performance |
| Clean pixels | Sharp pixels, no grid |
| Phosphor Dot / Phosphor Line | By 脑浆油条. Phosphor dots for handhelds, phosphor lines for home consoles and arcade |
| Brickboy DMG and others | GB-only original Game Boy screen effects (needs Vulkan) |
| 中登95 series | Complete looks with reflective frames and pictures of the real console: 3:2, 4:3 flat / curved, 16:9 reflective frame and more, shown only on screens of the matching shape |
- Shaders with their own frame (the 中登95 series) are shown full screen and need no bezel: applying one removes this console's bezel, and setting a bezel removes it in turn.
- With the floating button on, you can switch bezels and shaders right in the game; see the floating button section of Playing games.
#Setup wizard
On a new device, the setup wizard is the recommended way to set up emulators, bezels and shaders in one go:
- Tap Setup wizard at the end of Utility's tab bar.
- Consoles: tick the consoles you want to play (Tea recognises consoles already in your ROM folder).
- Emulators: each console lists its emulators with the recommended one first; install directly.
- Bezels: pick a bezel for each console that uses RetroArch, or None.
- Shaders: pick a shader for each console; LCD / CRT is recommended.
- Done: shows the result for each console.
The bezel and shader steps appear only if the consoles you picked use RetroArch; if RetroArch isn't ready yet they're skipped automatically, and you can set them up later in Utility. You can tap Close at any time, or Start over at the end.
Tip: the first time you use RetroArch, remember to download the cores you need inside it (Load Core → Download a Core).
#Updating Tea itself
Tea's Check for updates is under Settings → General. When a new version is available, a small red dot lights up on the ☰ menu button and on Settings. See Settings.